
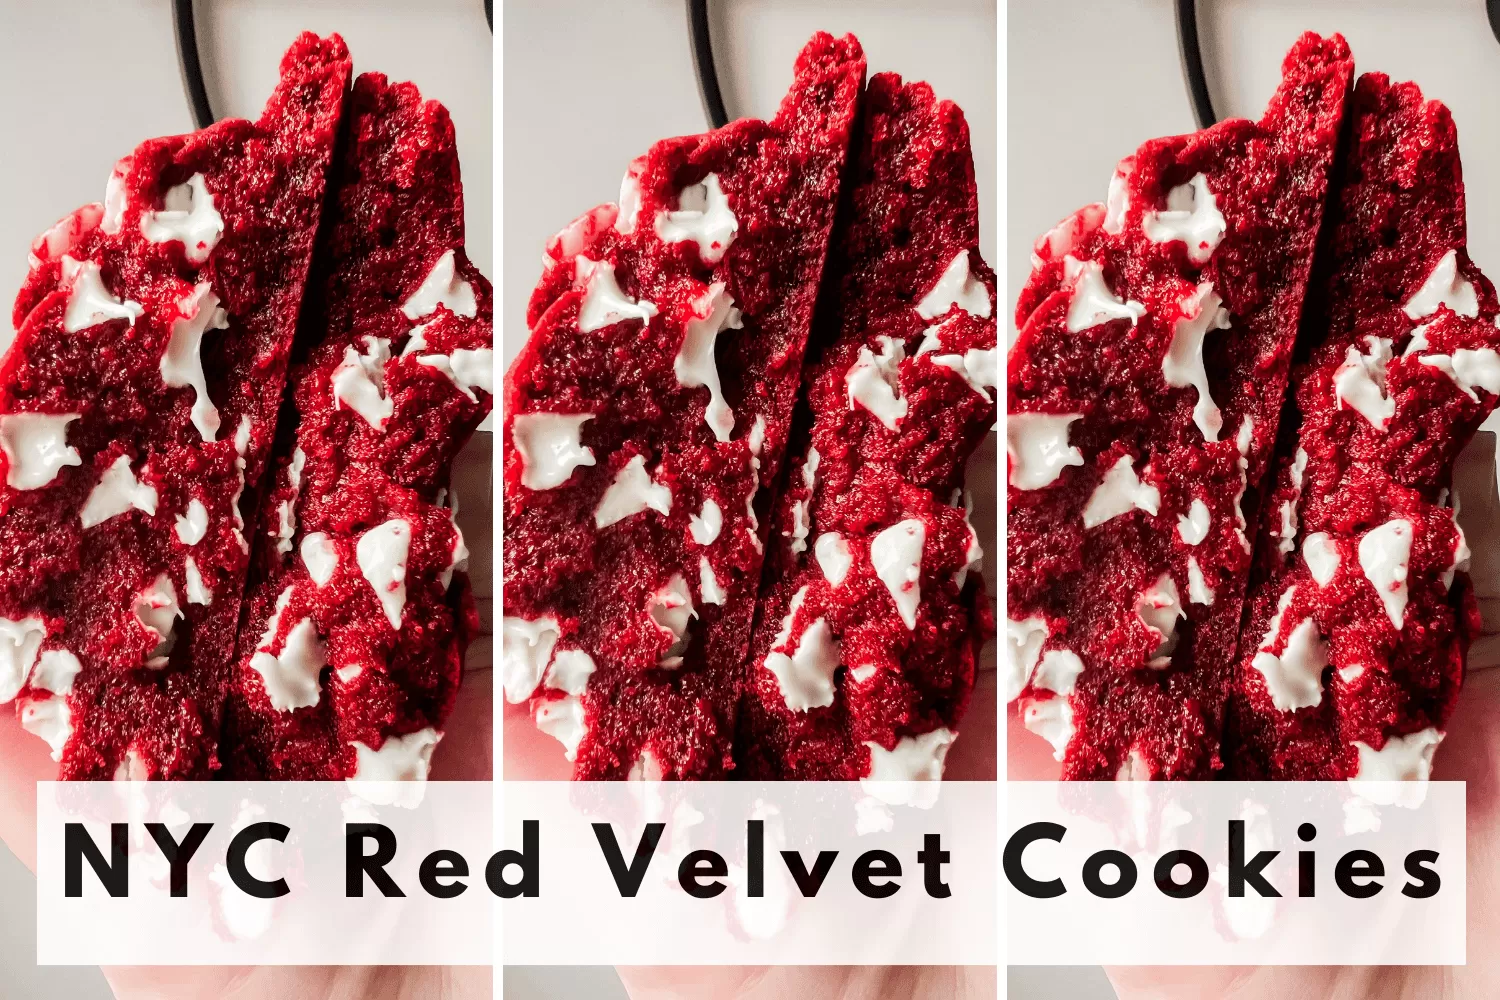
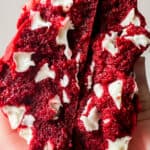
NYC Red Velvet Cookies
Are you looking to bake a batch of eye-catching thick red velvet cookies? Look no further, you’ve found the best red velvet cookie recipe! These NYC Red Velvet Cookies check all the boxes. Perfectly toasted on the outside, soft and chewy on the inside, and packed with cream cheese chocolate chips! We had to add in that classic cream cheese flavor in there somewhere right?!
In this post, you’ll learn exactly how to make gourmet-style, NYC Red Velvet Cookies right at home!
What exactly is Red Velvet?
There’s so many questions about what the classic red velvet flavor actually is. What is red velvet? Is it just chocolate cake dyed red? Is the flavor vanilla, chocolate, or a combo of the two? My best description of red velvet is a light chocolate flavor with a hint of tanginess. Oh, and a little splash of red food dye to get that signature pop of color we all know and love. These NYC Red Velvet Cookies are exactly that. A light chocolate flavor with the perfect hint of tanginess coming through in the cream cheese chocolate chips. It’s truly a match made in heaven!
Now that we’ve covered the flavor of classic red velvet, we can make these soft red velvet cookies come alive in your kitchen!
Let’s get started!
What You Will Need:
- A Stand Mixer with the Paddle Attachment
- All-Purpose Flour
- Granulated Sugar
- Brown Sugar
- Baking Soda
- Unsweetened Cocoa Powder
- Salted Butter
- Vanilla Extract
- Egg
- Salt
- Milk
- Corn Starch
- Red Gel Food Coloring
- Hershey’s Cream Cheese Baking Chips
- Cookie Sheet (This 3 Piece Set from Amazon is awesome, and you can usually find it on major sale!)
- Parchment Paper (Optional)
[Related Post: The Secret to Baking the Best Thick and Chewy Cookies]
A Few Helpful Tips:
- Whisk the dry ingredients together in a separate bowl first, this will reduce the overall mix time. We don’t want to risk over-mixing the wet and dry ingredients!
- Cold butter! This helps the cookies not spread so much and keep that bakery-style look we want.
- Use a food scale to weigh the flour and sugar. It is SO easy to accidentally add too much flour!
- No-Chill time required! Another reason why I love this easy red velvet cookie recipe!
- Weigh your cookie dough on a food scale (affiliate), this gives you a consistent size for each cookie. I weighed these at 160 grams each and was able to form 6 giant cookies!

This post was all about how to make gourmet NYC Red Velvet Cookies!
Follow the recipe below and you’ll have your home smelling like an award-winning bakery in no time!
Enjoy!
Ingredients
- 1 Stick Salted Butter 113 Grams
- 1/2 Cup Granulated Sugar 100 Grams
- 1 Cup Brown Sugar 213 Grams
- 1 Egg
- 2 Tsp Vanilla Extract
- 2.5 Cups All Purpose Flour 300 Grams
- 3 Tbsp Unsweetened Cocoa Powder
- 1 Tsp Baking Soda
- 2 Tbsp Corn Starch
- 1/2 Tsp Salt Heaping
- 1.5 Tsp Red Gel Food Coloring
- 1 Tsp Milk
- 1 Cup Hersheys Cream Cheese Baking Chips
Instructions
- Preheat Oven to 410°F
- Whisk Together Flour, Cocoa Powder, Corn Starch, Baking Soda, and Salt in A Separate Bowl
- Add Cubed Butter to Stand Mixer Fitted with the Paddle Attachment, and Mix on High for 1 min. Scrape Sides, Mix Again for 30 Seconds.
- Add Brown Sugar and Granulated Sugar to Butter and Mix on Medium until Combined and Fluffy
- Add Vanilla Extract and Egg until Just Combined. (Don't Overmix!)
- Start Adding Flour Mixture in Increments on Low until Just Combined
- Add Red Gel Food Coloring on Low Until Color is Distributed Evenly
- Add Heavy Cream or Milk to Bring Dough Together if Needed
- Add Cream Cheese Baking Chips (Save a Few to Push On Top of Each Cookie Before Baking!)
- Roll Each Cookie and Place On Baking Sheet. These cookies weighed 160 grams each and I was able to get 6 giant cookies!
- Line Baking Sheet with Parchment Paper and Bake on Middle Rack for 10-12 Minutes, Depending on Cookie Size.
- Let Sit for 10-15 Minutes After Baking Before Moving to a Cooling Rack, This Gives the Cookies Time to Set!
Notes
Shop My Must-Have Baking Favorites Here
Some links on this page are affiliate links, meaning we may earn a small commission if you purchase through these links at no extra cost to you. For further details, kindly refer to our privacy policy.
Just wondering when you say roll the cookie out how big and how thick?
Thanks
Hi Diane! I use a food scale to weigh giant cookies, and usually have them at about 160 grams or 5.5 oz. Food scales are pretty inexpensive, and you can find some less than $10! If you don’t have one, I would use a 1/2 cup measuring cup, pack with cookie dough then roll into a ball 🙂